Webinar

Expanding my Craniomaxillofacial intraoperative imaging experience with Loop-X, a mobile imaging robot

Themen
Intraoperative Imaging
MKG
Chirurgie
Sprache

English

Seite teilen

Beschreibung

Brainlab invites you to join our live webinar, “Expanding my Craniomaxillofacial intraoperative imaging experience with Loop-X, a mobile imaging robot”, on March 16, 2021 at 4:00 PM CET presented by Simon Enzinger, MD, DMD, Managing Senior Physician at the University Clinic for Oral and Maxillofacial Surgery in Salzburg, Austria

We look forward to meeting you online!

Language | English

In case you can not join the webinar, it will be recorded and shared afterward.

Participation is free of charge.

The views, information and opinions expressed within this presentation are from the speakers and do not necessarily represent those of Brainlab.

Referent

Simon Enzinger
Simon Enzinger

MD, DMD, Managing Senior Physician at the University Clinic for Oral and Maxillofacial Surgery in Salzburg, Austria

LinkedIn Profile

Moderator:

Jana Neider
Jana Neider

Product Manager CMF / ENT, Brainlab

To watch the webinar, please enter your contact data Please confirm that you would like to register for this webinar

    We offer our webinars free of charge. In return we ask for your permission to receiving promotional emails.

    Informationen zur Verarbeitung Ihrer persönlichen Daten finden Sie in der Brainlab Datenschutzerklärung

    Are you interested in an easier and faster way to register for upcoming events?
    Create a Brainlab ID account and save time before the next session. Gain access to MyBrainlab Online Services for more related event and webinar recommendations.

    Vielen Dank für Ihre Registrierung! Sie können die Aufzeichnung jetzt ansehen.

      To join our webinar free of charge, please confirm that we can contact you with related promotional material in the future.

      Information on the processing of your personal data can be found in the Brainlab privacy policy

      Thanks for your registration! You can now view the recording.

      Video Transcript

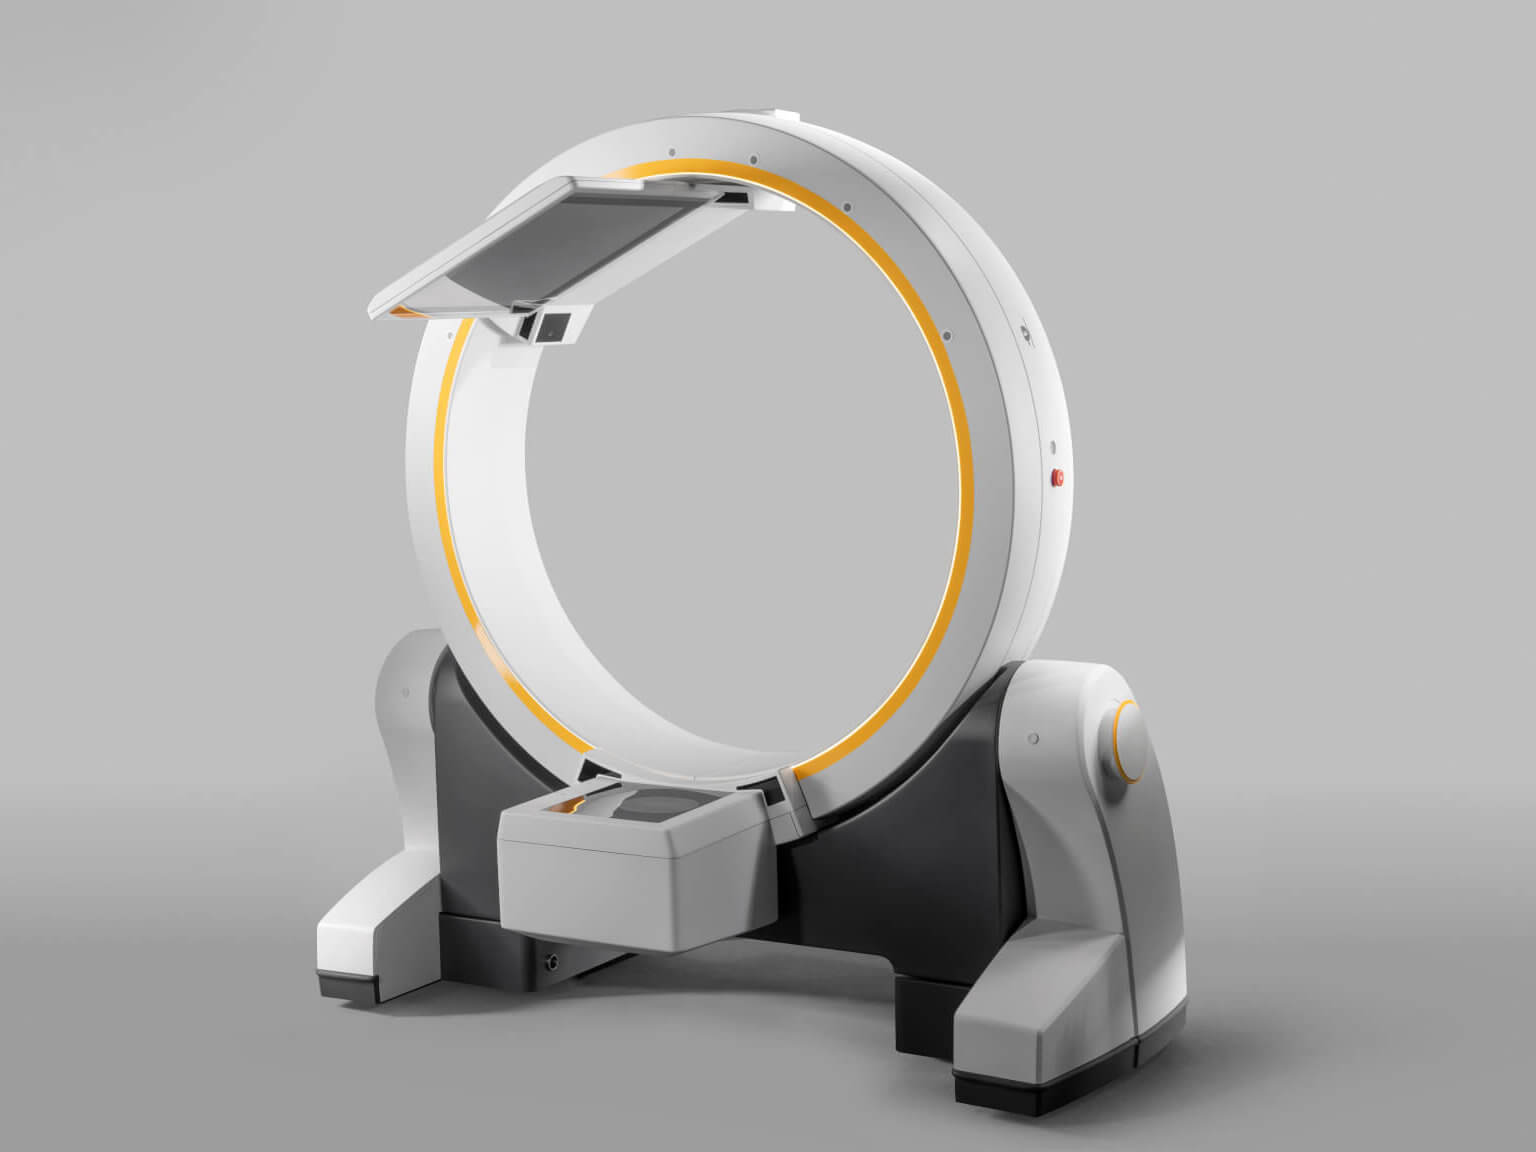
      Jana: Welcome to an exciting new webinar in our craniomaxillofacial series. My name is Jana Neider and I will be your moderator today. Before I introduce you to our speakers, Dr. Simon Enzinger and Dominik Schaefer, I would like to explain a few points. Today we focus on a new technology called Loop-X. Loop-X is a mobile robotic intraoperative imaging system, which can be utilized in many different indications. Today, we will focus on the craniomaxillofacial workflow. This lecture will start with a technical introduction by my colleague Dominic and be followed by a 55-minute session from Dr. Simon Enzinger presenting on his first clinical cases with Loop-X. We will then close that session with around 15 minutes of question-and-answer session and you can submit your questions any time during the webinar using the online chat function.

      This webinar is live but it will be recorded to be watched again at any convenient time. Please feel free to use the chat function in case that you have any questions. Now on to our speaker, Dr. Simon Enzinger. Dr. Enzinger studied medicine at the University of Innsbruck and he is now practicing as a senior physician at the University Hospital in Salzburg in Austria. Dr. Enzinger is specialized in trauma reconstructive and tumor surgery, but he is for sure also known in his great interest in future driving technologies. Therefore, we are very happy to have him here today presenting on his first cases with Loop-X. Dominik and Simon, the virtual stage is now yours.

      Dominik: Thanks a lot, Jana, a very warm welcome from my side as well. My screen is also shared. You can hear me, right?

      Jana: Yes.

      Dominik: Yes, very good. Yeah, very warm welcome from my side, as well. I’m Dominik Schaefer and before, Dr. Enzinger giving you an introduction on how to use Loop-X specifically on craniomaxillofacial indications, I want to make sure that you understand a little bit the concept behind Loop-X and that it also can be used on other indications. In some instances, it might happen that the craniomaxillofacial department wants to share the device with spine neurosurgery or traumatology and therefore, it might be good also for you as craniomaxillofacial surgeons to get an idea on how it can be used in other disciplines.

      Why and how did we define the requirements of Loop-X? One essential piece of the puzzle was, especially because the size of operating theatres is not increasing on average, for us, it was important that we have a small footprint. Nevertheless that we have a huge bore size, although this is contradicting at the end, we managed to do so. Lightweight, the system is just a little bit over 500 kilo and therefore it can fit in almost any operating theater. Of course, as a navigation company, the images acquired by Loop-X are automatically shared with the navigation and registered on the fly. It’s really the best position, the fastest way of registration and the most reliable.

      Besides, we want really to differentiate ourselves in imaging and really want to expand the field of view, maybe not so relevant in craniomaxillofacial indications but in particular for deformity corrections in spine surgery, or if you want to visualize the pelvis as a whole for stereotactic indication where the field of view might be limited with other devices to represent the localizer box. This is different with Loop-X, we can cover 25 centimeter in the patient access and up to almost half a meter in diameter, which is really a dramatic change. Although we have a huge image, we did not want to sacrifice the resolution. This is a scan with a standard phantom actually developed for computed tomography quality check. And one of these lines here which says 21 line pairs is actually equal 0.2-millimeter thickness, so it’s really fine resolution and this is in particular for craniomaxillofacial of relevance.

      So, in some instances, you may have an area of interest, which you want to focus your radiation beam on and want to make sure that you don’t radiate other regions which may want to be protected from radiation like the eye, for example. With Loop-X, you really can do patient-tailored imaging, the field of view is being defined according to your region of interest. And while spinning the system, at every microsecond, adjust the position, the angle of radiation, and all imaging components just to make sure that the beam hits your target region and nothing else. But as it also was important, sometimes time matters in the operating theater that you have an automatic dose calculation that you can scan pediatric patient, obese patient, all size, the dose calculation is being done automatically in the background.

      And one piece of the puzzle also that’s unique functionality, which is an adaptive filter wheel. So, all other systems have standardized filtering, Loop-X automatically pulls the right filter in order to make sure, for example, that you can do pediatric scanning properly. Also, which will come very soon in the future, Loop-X data will be able to be analyzed automatically by our Universal Atlas software. So, every box of the data set of the preoperative data sets and also the intraoperative data sets will be segmented automatically. That’s true for CMF but it’s also true for spine, as you can see here in this deformity case, screws can be positioned completely automatically. One nice functionality is Loop-X memorizes its position automatically. The home position next to the wall but also every surgical position is memorized, so Loop-X can return to the previous position automatically.

      In some instances, in spinal trauma surgery, there’s challenging projections, challenging ways how to do 2D imaging. And we thought because of our deep integration with the navigation, we can combine both. So, imagine I take my pointer. My point is supposed to divine my imaging trajectory like you’ll see here. So, I simply click one button, complete this thoroughly. I click on the pointer, and afterward, I press the foot pedal, and the whole system moves completely automatically and aligns with your chosen on-the-fly planned trajectory. Very nice, very intuitive. It was just three minutes wrap up for my side and to give you an introduction on the functionality of Loop-X, but Simon Enzinger is diving a little bit deeper on the clinical utilization of the system. Thanks a lot.

      Dr. Enzinger: So, thank you very much for this nice introduction as well. I’m from Salzburg, and so, many greetings from Austria to the community. My talk should take about three-quarters of an hour so that we have enough time to discuss after it. I’m part of the university clinic of the craniomaxillofacial surgery in Salzburg, the head of the department is Professor Gaggl. And we do have a center of reconstructive surgery within our department in which we work together with the ENT department, also trauma department, surgery, and neurosurgery. Also, we do have a core facility since 2016 together with the ENT department and the ortho trauma department. In this core facility, we share things like the Loop-X or the navigation system, but also stuff like 3D printers and, of course, software, which is most of the time a very expensive part of the health system.

      For the declaration, there are no conflicts of interest and all the views and information and my opinion does not necessarily represent those from Brainlab. So, what is going to go on the next time? First of all, we make a short theoretical background and I’ll present then four different cases in different skill levels, and after that is more of a short conclusion. So, the component overview shows you that we do need some images. We need images out of our PET System but it doesn’t care what kind of images, so it can be found in CT scans, MRI scans, or PET scans. These images are transferred to our planning software after, in this planning software, we can do any segmentations or manipulations. After that, we go to the intraoperative navigation system to navigate during the operation and we need intraoperative imaging system.

      So, first of all, we start with the planning tools. Therefore, we start for that. The imaging came out from the CT scan, from the MRI scan, or from the PET scan, or from ConeBeamCT. Then we need a planning software and after that, we can go to the post-processing of the planning. So, we do have some 3D prints for further planning or we can pre-bend on these 3D prints or meshes or we even can transfer this information to manufacturer of patient-specific implants. So, we see here a plan, for example, from a patient which had an orbital-floor fracture, we segmented here right over it because this was not damaged at the accident and we mirrored this image to the left-hand side and here you can see the gap between the blue line is the automatic segmented part of the merged orbit and the pink line is automatically mirrored orbit from the right side. So, we did some segmentation, we did some mirroring, and we did some advanced object manipulation to get to this.

      So, we can do this not only in the ordinary vision, but we can do it also in 3D vision, which ours automatically segment. For more skilled operation, for example, the hematoma extraction, we could plan in other views or we could take the PET scan like here, we could take the CT or the MRI scan. And we can differ between the soft tissue part of the tumor and the hard tissue part of the tumor. In the end, we get a quite good three-dimensional overview about our tumor, which was very useful for the resection afterward. Out of the planning come some data and this data can be transferred into Excel files, these Excel files I can put either into the navigation system or to our own 3D printers or we can send them to a manufacturer for patient-specific implants and all these files can also be added to the navigation system.

      So, mostly, everybody will know this the system, which is Brainlab, the intraoperative navigation system needs the skull reference area in our case. For the clinics, it can be used with other devices, the most important thing is that it has to be fixed on the bone that you want to navigate with. We have a lot of other instruments but for us, the most important instrument is the pointer. So, most of the time, we only use the pointer. The curve navigation system was presented a short while ago with some new stuff, like it’s really got smaller than the system before. And for me, there are some small parts that are really good, like here, you can expand the pole here and you can bring your monitor in the right position so that you have a really good view in the operation theater.

      So, now let’s come to the last part to the intraoperative imaging system. The Loop-X is a mobile robotic imaging system, which comes now as you can see automatically to the OR. It’s just driven by the joystick as you see in this video. So, this was put by cooperation between Brainlab and medPhoton and this is some technical data you get now from me. The dimensions are like what you see up here, the kilograms was told to you by Dominik. The point load is, for me, one of the key dimensions because some of the floors in the operation theatres are quite sensitive, so this is a really good point load for that. The field of view we’ve also heard before from Dominik is very large, especially the 3D volume, and also the 2D dimensions are really huge. The wide gantry opening is, especially in the operating theatre, a big advantage.

      The next advantage in my point of view is that the 3D imaging or the 2D imaging is not bounded to the center of the Loop-X, so, you know, you don’t have to move the Loop-X to get the best images out of it. Minimum size of the 3D imaging is 3 by 3 centimeters, the maximum size is 48 to 25 centimeters. The robotic imaging comes from the…moving only via a joystick and therefore, there is a really good part that you can store every session you want, so the home position, you can store the scan position one or the scan position two. You can even store some pathways if you want to move the Loop-X out of OR after the operation or before or it can also come via a stored pathway into the operation theater.

      Let’s explain here now some workflows and I want to split it up between preoperative planning workflow, pre-operation checks, and intraoperative navigation. Before the planning can start, you need an indication for the navigation operation. Then if you have a patient which is worthy to navigate with, the planning can start, you can make a segmentation, you can mirror, or make some advanced manipulations, and after the post-processing of the planning, you can either get some 3D prints or even patient-specific implants. Then you go to the operation theater, you check also the timetable, especially needed when you have a core facility when your Loop-X maybe can be used by other clinics as well. You have to coordinate all this stuff, especially with more expensive tools.

      Then, the Brainlab navigation system has to be there as well and also the instruments, then the data transfer has to be finalized and the models should be sterilized or the implants ready to use. Workflow intraoperative is before you can start, you should export the planning software to the navigation software…the planning of your case to the navigation software. After that, you have the registration scan, then the image fusion has to be done, after that you can operate and navigate it. And in the end, you may make a result scan or you can even make a scan in between, for example, removal of the tumor or a check if your navigation was correct.

      So, that’s so far for the theoretical background and let’s jump into the cases. Let’s start with Case 1. It was a 62-year-old male patient, he had a 40-meter freefall while ski touring, and got some injuries through that fall. There was a rib fracture and some epidural hematoma, some thoracic vertebral body fractures and some skull fracture and, of course, the orbital-floor fracture which was our part. Due to the other injuries, the patient came to our department about one week after his accident, so we had some time for planning and for preparation for the operation theater. Here you can see the slide from before, as well as I told you before, we took the right orbit, mirrored it to the level of the orbital floor, the pink orbit.

      We did with our printers two models, one model was printed with the damaged and one model was printed with the mirrored orbit. So, we could pre-bend a custom ordinary mesh to the mirrored orbit and check the fit of the mesh to the damaged orbit. This was for us only plan B because we try to fix this…or we found out during the process that the damage wasn’t so big that we maybe fix this in other ways. So, with this plan, we come to the operation theater, so we check the theater, we check the Loop-X for the daily task which had to be done every day. If it’s when we use it, then we checked our instruments, we saved the home position, we saved the scan position, and we mark the height of the table. And we did some special draping of the patient so that the operation clubs doesn’t get in touch with the Loop-X.

      The preparation for the registration scan, as you see here in this picture, the skull reference array was already fixed to the skull, we prep the patient in the right way, we picked the camera position, we check the position of the Loop-X via laser crosshair, and we check the table height, and perform the collision check. This was the view outside of the OR during the registration scan. And after registration, we just have to confirm the registration which was done here. And so, we could confirm that the fracture is still there because we have pinned the side of the filler here. Also here, we want to try to check if the nerves are intact. So here, it’s in the middle of the operation and we put in here into the maxilla an enthesis [SP], maxilla enthesis, which is filled by fluids, and after that, we put into the orbital floor some foil which is dissolvable. This enthesis are removed about four weeks after placement via nose.

      So, this is the final scan. The results scan, as you can see here, the enthesis, and here is the…we check if the foil is in the right position. As you can see here, it was a little bit too deep in the maxilla and we repositioned it and the outcome was quite good. Let’s come to case number two. Case number two was a 69-year-old male patient, he had an E-bike accident with quite severe injuries. He had a subdural hematoma, he had a perifocal brain oedema, he had some pyramid fractures on the right-hand side with oto-liquorrhea on the right-hand side. And the fracture of the os temporale on the left-hand side and the orbital roof fracture and dislocated midface fracture on the left-hand side. The problem of this midface fracture was that there have been three parts which were very loose, inclusive the zygomatic bone in the zygomatic arch, and the nasal bone was loose as well. So, there were no really points to reference there.

      This is the workflow before navigation, we fix the skull reference area to the head again and we try to find the best placement of the area and adjusted and after that, we go into the registration scan with the Loop-X. Therefore, we need two pictures, two 3D pictures, one AP, the other one is the lateral, and as you can see, you can adjust the volume you want to scan afterwards really freely. So, you can change the size, you can change the position after you had this many pictures. The most important thing in this part is that you have to find the structures which you have in the…you have later on in the planning because you have to fuse this registration scan with the scan you performed.

      After that, we go to the collision check, so we can…also we check here the camera, we check the height of the patient, and so on, as you see here, and the sensors are going around. After that, we start the registration scan. As you can see here, the data are transferred automatically during the scan and they are reconstructed, as you can see here, directly during the scan and you can transfer it to your hospital PAC system. Now the image fusion comes, therefore, coarse positioning by hand, and after that, we use the auto fusion to get a better result. We check auto fusion to confirm all the results and after that, we did some confirmation during the operation. In this part of the slide, you see the pointer tip is just at the tip of the orbital rim, which was dislocated for about one and a half centimeter to the back. Then, our navigated operation starts.

      As you can see here, after repositioning the first part, we’re quite in the center of our plan, as you can see here, which was this screenshot. The screenshot is right here, as you see there is the point of the tip and the red line is our plan and as I know from the operation theater, this was the exact position of the bone in this part of the operation. The operation moved further on, we did the puzzle together, and we went further down to the orbital rim in the lower part, and here as well, the part was replaced and checked via navigation and fixed in this position. After everything was fixed, we did the results scan. And as you can see here, the red line is the aim and it just had a perfect match here. I was also able to do it intraoperatively, so here you can see the 3D reconstruction, and here you can see the 2D scans…the 2D part. Here is our plan and this is the result.

      Let’s come to Case 3. Case 3 was a midface reconstruction after a fireworks explosion, a 31-year-old male patient had an accident at the wedding of his best friend. He had a firework battery exploded in that moment that he wants to reset it. And in this injury…or in this accident, he had a complex midface fracture, he had a loss of his right eye, and he had a fracture of the temporal bone and the neurosurgery treatment was necessary for this patient there. Here, it was quite some time in a coma because of the very poor conditions of this patient but after he was getting better and better, the neurosurgical department asked us to reconstruct the midface.

      This was about two and a half years ago, but for the patient, the plates broke about two years after the reconstruction and there was a dislocation in the midface especially of the soft tissue. As you can see here, the first picture here with a severe dislocation before the first operation, and here you can see the dislocation before or shortly before the second operation. We did some printing, we printed the model out, we made off the model operation, and transfer that into the navigation system. And in this case, we just had some preparation before putting in the skull reference array. So, in the beginning, it was only visible on the scanner, not the patient, and it wasn’t connected still in this moment.

      So, we did some preparation as you can see here, and we’ve fixed here the skull reference array and now you can see here all lines are green, lights are green, and therefore, you’re ready for the navigation scan…sorry, for the registration scan. The scan was performed and as you can see, here, the volume was adjusted and over here you see the image fusion. After image fusion, we could see our plan here and the soft tissue which…sorry, and the hard tissue here. After, the operation…sorry, we operated and navigated the whole rest of the operation. We all checked and tried to refix everything, especially with the soft tissue was in our mind. We did a midterm scan because the soft tissue was really hard to get in place.

      And then we come to this end, where you can see the soft tissue here that are in our aim, then the soft tissue of the preoperative situation, and this is the intraoperative scan, where you can see here…as you can see here better, the eyelid is in the correct line and the position of the eyelid is much better than in the pre-op setting. Now, case number four is coming, it was a meningioma patient and this was actually the first case with the Loop-X. So, our workflows haven’t been optimized because it was, you know, the first time. It was a 53-year-old female patient with a meningioma on the left side. It was known for years but now the pain was increasing. She was before repeatedly operated on and irradiated.

      The problem now was the left…sorry, yeah, the left eye was getting more and more blind and she just could see some light bubbles, that was everything left from the vision on the left eye and she had increasing problems with pain and therefore, we decided to make it in the next operation. This was one of these operations in this center which from the craniomaxillofacial surgery team was Professor Gaggl, Professor Rasse, and me, then the neurosurgeon was OA Krainz and the ENT surgeon was OA Dejaco. The planning goes between the CMF department and the neurosurgery department. The workflow of this case, first of all, the case was presented to the reconstructive surgery center.

      The three surgeons and neurosurgeons came together to try to start the planning, therefore, we have a 3D printed model of the situation and this took about two months before the operation took place. Here is the model of the perioperative situation, as you can see here, the first operations are visible. Then the planning took place, as you can see at the top, the yellow lines have been the soft tissue tumor, the red lines have been the hard tissue tumor, and altogether are seen here in three dimensions and in the software, you can turn it as you like. And then, the further workflow was that the patient was informed about our meetings and about perioperative settings.

      She was examined about her other illnesses, lung function, and so on if she’s capable to take this long operation. The planning of the resection was formed together after that in consultation. The patient was informed in all three clinics so that she gets the whole view. Then, one month before the operation we had a final meeting where we finalized the margins. At the same time, we transfer the information to the implant production company. Ten days before the operation, we finalized the implant. And this was the slide from before, so we got this pathway here, and through the company of the implants, we got this plan which doesn’t only contains the size of the implants but it also contains the cutting guides.

      And the workflow goes on with the implants which arrived two days before the surgery. The patient was informed about all that took place, then we discussed the procedures with the whole operating team, so with all the nurses and so on. The operating team prepared for the operation the day before and we check the equipment and checked the implants. So, again, here you can see the cutting guides are fitting perfectly here in the model and here the original implant, the view from inside the skull. Now, the further workflow was we have to prep the skull, we have to fix the skull reference array, we have to make the reference scan, we have to remove the tumor navigated, and to reconstruct everything, also navigated. So, we have to put in place the PEEK implants, the local flaps, and the medial femoral condyle flap, and the final scan or the results scan has to be performed.

      The estimated time of this operation was between 18 and 20 hours. So, we started in the morning, 7:00, everything comes together, the anesthesia, the nurses from our department, the equipment was checked, the Loop-X was checked. The neurosurgeon was checking on the plan again just to finalize everything, then the last team meeting with the models to fix the stretches. And some pictures were made after that, then everything was operated for the operation. Here, the patient is already in anesthesia and the cover-up was started. Here you can see it’s about 9:35 where everything was ready to start. In the beginning, we prep the skull because we wanted to fix it directly. It was about 11:15 when we have been ready for the first scanner.

      At 11:45, we did the first scan with the Loop-X for the registration and after that, we had some secure points marked on the navigation system. Some intraoperative screenshots just to confirm everything and then the operation could go further on. At about 13:00, the microscope came the first time and the navigation was all the time part of this surgery and basically, cutting guides are navigated to get the right shape for the implants. At about 16:35, this microscope was put in again to remove further…to get more of the tumor out and the tumor was navigated for that navigated time. So, small pieces have been cut out every time, then the eye has to be removed, and the results also have been checked after the removal.

      And then the final pictures of the skull after removal of the tumor and before the reconstruction can start. Here is the final check if everything of the tumor is gone. And here the reconstruction has already started with the positioning of the implants. Then, the next part was reinserted like the zygomatic arch and the temporal muscle. And here you can already see the medial femoral condyle flap which was used to get a good base for the [inaudible 00:42:15] for the glass eye which is going later on. Here you can see the medial femoral condyle flap. There is a bony part here and the good part about that is that it’s very thin and the soft tissue above it and with only one artery and one vein up here, which have been reconnected to the temporal artery and vein on the patient. Here you can see a really good base for the later on produced glass eye.

      Final check about 3:40 in the morning and the scan was performed, and after that, the patient was transferred to the intensive care unit. A day after the operation, the MRI control was formed. Two days after the operation, the patient could wake up and was transferred to four more days to our department. She could leave the hospital about three weeks after the treatment. So, in the end, now some conclusions. The advantages, in our point of view, for Loop-X in the intraoperative navigation is the very fast and extremely precise registration which has been verified in all kinds of skill…in all kinds of operations. As you can see here, it is really quick and it is really easy to use.

      That’s the next advantage in my point of view that it’s not only the hard is easy to use but also…the hardware, but also the software. It’s a really nearly perfect coordination between the Loop-X and the Curve navigation system, everything runs very smooth, and it’s a really fast transmission to the PAC system either. As you can see again here in the slide of the tumor, it was easy to get all this stuff together here to differentiate between hard and soft tissue, it’s really smooth planning here. And this file sharing…sorry, file sharing is quite easy there through the STL files. And we have another advantage is the huge gantry and the huge field of view and the volume is not bounded to the center of the Loop-X.

      It’s just low radiation for the patient because it’s not a CT but a cone beam, and therefore, no radiologist is needed in the OR which makes planning easier. And the storable scan position is very helpful as well. Last but not least…you can see the Loop-X again, but last but not least, there is a very good hard and soft issue result in the scans. So, I want to conclude…as you can see here, even the muscles and the orbital nerve, another one, and let me conclude. Thank you for the opportunity to talk to you for this day and if you want any further information, don’t hesitate and write me some emails or contact me otherwise. Thank you very much.

      Jana: Thank you, Simon, for that very much interesting talk and especially for guiding us through your first cases with Loop-X, so very exciting cases and I think we already received the first question that I would like to address to you in a second. So, I would like to remind everyone, you can still send us questions using the online chat function and then I will still address them to Dr. Enzinger. Simon, the first question that came to you also comes with a nice thank you for a very interesting presentation, really appreciate the insights that you had on Loop-X. And the question is, „Are the intraoperative scans 3D or 2D scans that you are using?“

      Dr. Enzinger: So, for the registration we had to make, first of all, 2D scans to get the information for the 3D part and after that with these 2D scans, we set the dimensions of the volume for the 3D volume. So, especially in the face part, there are so many other small parts in between that 2D imaging isn’t too informative, so most of the time we performed 3D imaging there.

      Jana: Thank you. The next question, what is the most beneficial robotic function that you actually use to support your craniomaxillofacial case?

      Dr. Enzinger: The robotic function was the storage of the scan position and the storage of the home position that we can move quite easily between these two positions, because especially in the second scan or in the results scan, if the head isn’t moving too much, then we don’t need to make the 2D planning images again so we had lower radiation for the patient and we can adjust the volume very easily through this first made two-dimensional images.

      Dominik: Maybe just to re-emphasize again, the system automatically memorizes its position, so any 2D image, any 3D image, the system stores its position on the floor, its rotation, its tilting, etc., so that you can re-acquire the same image again. Like Simon said, you want to make sure that the patient has not moved but the system will move exactly back to the same position.

      Jana: Thank you, Dominic. One question from my side, Simon, actually, what would be the ideal robotic solution that you would wish to have? So, is there any feature that after you have tested the system for the first time for the first cases, is there any robotic feature that you could imagine that you would like to have in the future?

      Dr. Enzinger: Close to Christmas? Of course, there are a lot of robotic features…just a second.

      Jana: Sure. Also, we see that we still receive some more questions. I think we have a connection issue with Dr. Enzinger, so maybe I can phrase the next question and give that to Dominik. „So, thank you for the interesting presentation, may I know your indication for the registration scan? So, for all or only selected cases? As a navigation, we normally use surface or point registration, unlike in spine surgery. Why would you actually do an automatic image registration compared to a standard registration?“

      Dominik: The registration method of our so-called automatic image registration simply is the most accurate and because we can reduce the dose, actually, the added radiation to the patient is really minor. So, independent on the patient position, you can make sure that you have a very reliable, very accurate, and very robust registration. And that was the main purpose because I think Simon may answer to this, for this particular indication, he wants to have the best precision as possible. The question was, Simon, why you did the registration scan instead of doing the surface scan.

      Dr. Enzinger: Because the registration scan is so much more precise than the surface scan and easier to do and, I think, faster because you have no special…you don’t need any special devices, you can jump into the navigation right away after the scan, and the position is really much more precise than with soft tissue scan.

      Jana: Thank you. And the next question is, „Did you utilize the intraoperative imaging asset to control the tumor resection, or did you mainly use it for patient registration and for the final check of the implant position?“

      Dr. Enzinger: Actually, in the first case, we didn’t use it but this was only a matter of the time of the day. We have been…the next case like that, we will make a mid-time scan to re-verify the tumor resection as we did with the midface fracture repositioning part. So, that’s another advantage of the system, so I can jump in and jump out with the system quite easily and redo scans in the same position. And the radiation for the patient is about a 10th of a CT scan, so it’s not that…the radiation is really low for the patient.

      Jana: Thank you. I think that also maybe leads to the next question that also comes with another „Thank you,“ and then also I have to say to you, „Greetings from Kuala Lumpur,“ so very international today, so I’m receiving questions from all over the world. And one question is, „What is the biggest advantage of the system that would make you buy that system?“ So, what is the most important feature of that system?

      Dr. Enzinger: I think it is the working together of all the parts because the navigation system and the Loop-X are really combined and cooperating in a very precise way and the Loop-X on its own is good, the navigation on its own is good, but it is perfect in combination. And for me, it’s like getting out of blindness, you know, now you have a feature where you can tell during the operation precisely where you are and you can check your plans, check everything like what do you want to be checked with. So, the combination of the Loop-X and the navigation system is, for me, the glue of this whole system.

      Dominik: May I add one question because you mentioned you add now a lot of technology to your surgical procedure, what was the learning curve? So, the learning curve regarding the setup and also the learning curve, like, how to use the system, actually.

      Dr. Enzinger: It was a really steep learning curve. So, as you saw in the last case, we started quite late, it took us a lot of time to bring everything in place. In the last operation, it was about half an hour to redo everything, so we came down from about two hours preparation to half an hour preparation within five or six operations. So, everything was very, very fast to settled with the workflows, we’re getting better each time, and really steep learning curve about that. And I think also the using of the Loop-X in the end, in the last operations, we didn’t need any further help from you or from the guys from medPhoton, so we could do all on our own within a few uses. So, it is quite a self-explaining system and we were really happy to try that out and it was incredibly fast how the learning curve came up.

      Jana: Thank you for the insight. So, one question from my side, so how did the team react on that system? I mean, Loop-X is…I mean, it’s another device in the OR, so how was that perceived from the nurses, from the OR staff? Yeah, how did they react?

      Dr. Enzinger: I think, in the beginning, the OR staff wanted to kill me because I came up with another device. Actually, in the beginning, they were very shy and very…yeah, they want to touch it but the last scan, I had to…there was quite a fight about who is allowed to do the scan and who is allowed to do that and who is allowed to do that. So, everybody just got to know the system and saw that it’s really easy and it’s self-explaining, so in the end, everybody was very satisfied with it but at the beginning, it was a big fear.

      Jana: Thank you. Sounds great. I think then, immediately, and your question comes exactly to that, „So, is the system wired or wireless between scan and navigation system when it comes to the bigger transfer? How is that being done?“

      Dr. Enzinger: It was wired. The transfer was wired but I think it’s also possible unwired but, Dominik, this could be a question for you better because I just know in our OR, we don’t have any Wi-Fi because it’s the policy of the hospital, so it has to be wired in our ORs. So, maybe in other ORs, it’s allowed, here it wasn’t, so therefore it was wired.

      Dominik: Yeah, that was exactly the point why we started with the wired connection, because of regulatory requirements in certain regions, we want to have it wired. Nevertheless, we are also working on a solution on how to have it wirelessly connected, the navigation system and Loop-X and as well the PAC system.

      Jana: Perfect, so I think we have an option for wireless as well as wired, so completely up to the OR staff how they want to handle that and for the hospital. And there was another question that’s regarding draping, „Draping the system, draping the patient, how is this being done in your OR and what other options do we might have?“

      Dr. Enzinger: The draping of the system wasn’t done in OR because we try to drape the patient quite in that way that nothing touches the Loop-X. Therefore, we had some drapes around the table from underneath, that nothing was hanging loose in the area where the loop comes around. This was a little bit challenging in the beginning and our nurses did a really good job to manage this, but on the third operation that we performed, there was a good solution for this problem and therefore we had no further problems in this case since then.

      Dominik: In general, we recommend for 3D imaging to simply add another layer, another additional sterile drape, in order to make sure that we don’t make an unsterile incision, or the incision area unsterile. So, that’s the standard workflow for 3D imaging. For 2D imaging, we will come very soon with a drape for the image intensifier, so for the detector and for the X-ray source and for the gantry itself. So, there might be indications where you need more frequently 2D imaging and we will have a solution for this as well.

      Jana: Thank you. I think that was the last question actually from the audience, so maybe we can come back to the question that I phrased when we had some internet connection issues. My question was to you, Simon, what would be your robotic wish, what should be the next step for that system to satisfy your craniomaxillofacial procedure?

      Dr. Enzinger: It’s a hard one for the last one. I want to make things even easier to move…that’s the last thing I saw from you, Dominik, with the pointer, this would be quite a good start for me for the next robotic imaging that you just point on a specific place on the skull and you focus there, this is pretty much the way I want to have it. The next thing would be for me that they…well, especially in our case, we have a very small operation theater and it would be perfect then just to press on a button on the Loop-X and the system drives out automatically in the right position but these things are done quite soon, I hope so. So, for the robotic part, it’s a little bit hard to tell.

      Dominik: So, maybe a comment on the first thing, I think this is gonna be an Easter gift to you because that’s what we actually can demonstrate to you already.

      Dr. Enzinger: Oh, perfect, I’m really looking forward to it.

      Jana: Perfect, I think that’s the best closure we ever had, Easter gift coming soon to Salzburg. And I also want to close the webinar for today, so, thank you, Simon, thank you, Dominik, for a very interactive discussion for a very nice presentation. I will share with you as to all the greetings that we received from all over the world. And, yeah, also thank you for your attendance on this webinar, we soon going to have our next webinar, so just follow us on brainlab.com/webinars web page to check for new webinars and our series and just register for them. And if you have any questions, feel free to send us an email to [email protected] or follow us on all social media channels where we also post on the latest technologies, of course, as on this webinar series. Thanks again, everyone for joining today. It was a very interesting discussion and hope to see you all back soon. Thank you and goodbye.

      Dr. Enzinger: Bye-bye.

      Dominik: Bye-bye.

      Related Webinars

      02Blurred_lights_full
      Image Guided SurgeryCranial Surgery+ 3
      Ultrasound Navigation: Confidence in Tumor Resections

      Brainlab invites you to a live webinar, “Ultrasound Navigation: Confidence in Tumor Resections”, at 4 pm CEST on August 3. This session is hosted by Dr. Aliasgar Moiyadi, MD, at the Tata Memorial Centre, Mumbai for Treatment Research & Education …

      Image-Fusion-ent-5-webinar
      Intraoperative ImagingHNO+ 1
      Complex Case Discussion Focusing on Navigation and Image Fusion in Sinonasal Tumors

      Brainlab invites you to join a live webinar, “Complex Case Discussion Focusing on Navigation and Image Fusion in Sinonasal Tumors”. Taking place on March 10, 2021 at 4:00 PM CET, this webinar will be presented by Frank Haubner, MD, Senior …

      Priv. Doz. Dr. med. Frank Haubner
      webinar-cmf-9
      Intraoperative ImagingMKG+ 2
      Benefits of navigation and intraoperative imaging in Cranio-Maxillofacial Surgery – a clinical case review

      Brainlab invites you to join our live webinar, “Benefits of navigation and intraoperative imaging in Cranio-Maxillofacial Surgery – a clinical case review”, on February 9, 2021 at 4:00 PM CET presented by Prof. Julio Acero, MD, DMD, PhD, President of the …

      Prof. Julio Acero

      See more upcoming webinars

      Register now